Pages

Showing posts with label Friday Fiber Fun. Show all posts

Friday, September 02, 2022

Friday Fiber Fun: Joining a Chainette Yarn

Hallelujah, it's Friday! It's been a long week, with the Mister on a work trip and school starting, so I'm especially looking forward to a long holiday weekend (that I get to start earlier thanks to my office's closing at 2 p.m. today). Today is also our 15th wedding anniversary, which we're planning to celebrate with dinner out tomorrow.

Today I wanted to share a little photo tutorial of how I've been joining the yarn I'm using for my Quotidian Tee. I cannot take credit for this method, as Mary explained it to me via email, but I know that many people (me included!) learn things best when they're presented visually, so I thought I'd snap a few photos when I came to the next join so I could share. I apologize if these are hard to see, but the yarn is pretty fine; keep in mind that you can click on any photo to make it larger.

The yarn I'm using here is Knit Picks Lindy Chain, which has a chainette-style construction -- think of an I-cord or crochet chain. There are a number of yarns out there with this kind of construction, though they're not all exactly alike. Some are big enough and have enough loops that you can actually graft the ends together, but that's not the case with Lindy Chain. When you pull this yarn apart, you typically get no more than two loops. So the join I'm using is sort of a modified Russian join. To accomplish it, you'll need a couple of needles and a pair of scissors.


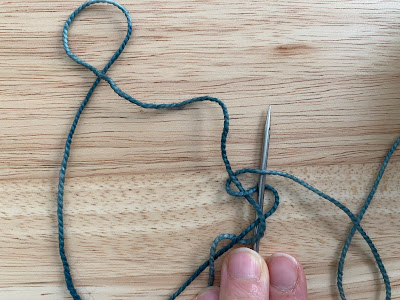
The first step is unraveling each end enough to have tails long enough to work with and two loops. What I've done here is put a needle through the two loops on each end, each one pointing a different way, and then threaded the needles with the tail of the opposite skein of yarn.


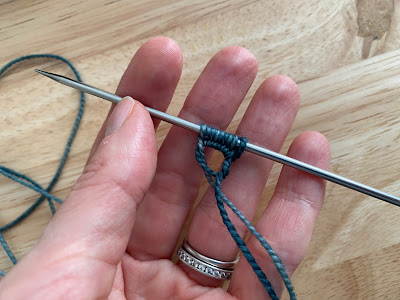
I pulled the needles through the loops and pulled the tails so that the two yarn ends are snugged up next to each other. Then I pushed the needles through the loops again so that the tails are making a full circle (through the loops of the opposite skein, then through the loops of the skein they are attached to).


The last step is burying the end in the strand of yarn by poking the needle through the strand repeatedly, just like in a typical Russian join. You can see here I've already pulled the needle through on the left and it's still in the yarn on the right.


When the yarn is pulled taut, the join is virtually invisible, and all that's left to do is trim the yarn tails that are sticking out. And that's it! This join is a little fiddly, particularly with a finer yarn, but I've found that it gets a little faster every time I do it.

I hope this is useful for you, and I hope you have a wonderful weekend!

Friday, April 08, 2022

Friday Fiber Fun, Dishcloth Edition

We've made it to Friday, and today I have a dishcloth "recipe" to share with you. I don't feel right calling this pattern; I used the stitch count from the Ballband Dishcloth and a photo from another pattern to inspire me, so it's really more of an adaptation. But I really enjoyed this slip-stitch mosaic knitting and thought you might like it as well.


This pattern uses two colors of kitchen cotton; I used Lily Sugar'n Cream in Dazzle Blue and Overcast, about 45 yards/41 meters in total. You'll use a bit more of one color than another (because you work two more rows with one color compared to the other). If you reverse the colors, you will have plenty two knit two dishcloths with some leftovers with two balls of cotton.

My cloth is roughly 9 in. by 9 in./23 cm by 23 cm square and I used US 6/4.0 mm needles. You will use one color at a time, alternating every two rows.

With Color 1 (C1), cast on 45 sts.
Knit 1 row.

Row 1 (RS): With Color 2 (C2), k4, slip 1 with yarn in back (wyib), *k5, sl 1 wyib; rep from * to last 4 sts, k4.
Row 2 (WS): With C2, k4, sl 1 with yarn in front (wyif), *k5, sl 1 wyif; rep from * to last 4 sts, k4.
Row 3: With C1, k1, sl 1 wyib, *k5, sl 1 wyib; rep from * to last st, k1.
Row 4: With C1, k1, sl 1 wyif, *k5 sl 1 wyif; rep from * to last st, k1.
Rep Rows 1-4 nineteen more times, then rep Rows 1 and 2 once more. Break C2.

Next row (RS): With C1, k all sts.
Bind off all knitwise.

Weave in all ends and trim tails. Enjoy!

Friday, December 17, 2021

Fiber Friday Fun: An Unvention

Happy Friday! Today is officially my second day of vacation, but it started with an early orthodontist appointment for Rainbow and will likely be filled with cleaning and packing and everything else I need to do before we leave for our trip. But first, I have maybe-new cast-on to share with you that I (in the words of Elizabeth Zimmermann) "unvented" when I started the second of my doubled hats.

When I started Rainbow's hat, I used the Emily Ocker method of casting on, but I always find that a bit fiddly because I have to find a crochet hook to do it. As I was getting ready to start my own hat, I started brainstorming ways to achieve a similar look but without needing any tools. It's likely someone else has already figured this out, but I though I'd share with you what I did. I have just photos for now, but if I can get someone else to help me at some point, I might be able to take and post a video.

This cast on is a sort of mash-up of the above cast-on and a figure-8 cast-on. First, you'll start by making a circle with your yarn, large enough for your ball of yarn to fit through. Tie it in a half knot, just so that the circle stays intact (you'll untie it later). Lay the circle to the left and put your needle tip to the right, with the yarn attached to the ball going on top of the needle.


Next, wind the yarn around the needle, bring it up between the needle and the yarn loop, push the yarn ball through the loop of yarn, bring it back up between the loop and the needle, and bring it back over the needle again -- basically making a figure-8 with the yarn.


Repeat the above steps until you have the correct number of stitches on the needle, securing the last stitch around the needle by passing the ball of yarn through the loop. Close up the loop most of the way by pulling on the yarn tail.


Now divide up your stitches as needed on your needles; I'm going to be working magic loop, so I split the eight stitches I cast on in half.

Knit all the stitches for your first round to stabilize the cast-on.


Now you're ready to start increasing! To tighten up the cast-on, just tug on the yarn tail (I've made a little yarn butterfly with mine). You may notice that the circle wants to loosen up a bit as you work, but you can pull it snug again very easily. Once you've got enough fabric knit, you can pull the tail tight and weave it in.

You may find that this cast-on is a little fiddly, but it's easy to tighten it up after you've gotten the stitches on the needle. You can also make the loop of yarn as large as you need to, but keep in mind that more yarn will mean a longer tail at the beginning, and if you're knitting a hat where you want to use up as much yarn as possible, a much longer tail will use up some of that.

I hope this is helpful to you! Please do let me know if you use it or if you have other questions about it. Also, I'm still debating whether I should write up the full pattern for how I knit my hats with the swirl increases and decreases, so let me know if that's something you'd want.

Happy Friday, and have a great weekend!

Friday, October 29, 2021

Not-So-Fun Fiber Friday; or, A Cautionary Tale

We've made it to Friday, the last one this month. And this weekend is Halloween, so I have a slightly scary story to share today -- a story behind this mess:


Ignoring all shoes below the bench, what you see here is the contents of our winter accessory boxes -- the storage containers we keep on the shelf in our coat closet to hold the hats, gloves, mittens, cowls, and scarves we wear throughout the winter. Because they're up on that shelf and there's no light in the closet, we don't often look in those boxes, and that's a big mistake.

But I'm getting a little ahead of myself here. First, I have to come clean about a dirty secret, one that will strike fear into the heart of any fiber enthusiast: I have been battling a moth infestation. The source of it was a fleece that I bought several years ago. It was one I bought sight unseen, from the mother of a friend, and I made the mistake of not washing right away or even really inspecting when it arrived. I don't know if the moths were there when it arrived or not, but at some point I discovered that it was full of moths. Not wanting to waste the wool or the money I'd spent on it, I attempted to salvage it. After I washed it, I'd put it into a plastic bin and stored the bin in the basement -- far enough away from my handknits, or so I thought. After seeing quite a few moths flying around, I examined it again and found that the problem hadn't been solved, so the entire fleece went into the compost.

Late last week, when the temperature dropped and I wanted a pair of mittens, I pulled out one of my favorite pairs -- only to discover the telltale signs of moth damage, including a hole. That prompted me to pull out both bins to examine the contents, and sure enough, those blasted beasts had gotten to quite a few things. So now I'm in the process of washing everything. If there's any upside, it's that a lot of what was in Rainbow's bin was old and too small, and much of that was superwash or synthetic and easy to throw into the washing machine. The hole on my mittens was small and near the top of the hand, so I may just needle felt that spot so that it doesn't unravel further. One item that will require some more significant repair is a cowl that Rainbow knit herself (it's the yellow/pink blob near the far right in the photo) -- it was knit loosely in bulky yarn, and it looks like a strand was completely chewed through, causing some unraveling.

I'm posting about this so that my bad experience can be a lesson for all of you. Moths can happen to anyone, but you can take steps to prevent damage from them. First of all, if you are a spinner who likes to work from fleece, wash your fleece when you get it! Inspect the fleece outside and don't be afraid to toss any bit that looks suspect. But there are other ways for moths to get in, so you can do plenty to dissuade them from munching on your woolies. There are plenty of moth traps you can buy that use pheromones to attract the moths to land on a sticky substance from which they can't escape -- and you want to trap the moths, because what does the real damage is when they lay eggs on your yarn or projects and the larvae munch through it as they emerge. What attracts the moths more than anything is dirty wool, and in a knit/crocheted/woven project, that means the dirt and body oils that get on your wool items when you wear them. So an easy way to prevent the moths from getting to them is to wash them frequently! I typically wash my sweaters at least once a season (because I rarely wear them directly against my skin), but things like hats and mittens really should get washed more often. Most importantly, take your hand-made items out frequently and inspect them -- and remember that if you do find damage, it often can be fixed, and if not, the sheep will keep growing more wool!

I hope you have a great Halloween weekend without any moth-related scares!

Friday, October 15, 2021

Fiber Friday Fun, Rhinebeck Edition

By the time you read this post, I'll be somewhere in the Rhinebeck, New York, area. I'm setting this post up ahead of time so there's not a long absence from the blog, but I'll likely wait to catch up with all of you until I'm home.

I mentioned sometime last week that I was thinking about taking another sweater project with me, and I even wound up the yarn and swatched for that sweater. But I realized that if I had two fingering weight sweaters on the needles, I wasn't likely to make a lot of progress on either one, so I have only taken my Shifty on the trip (with a sock project for when we're out and about) and I'll wait to cast on for my May(be) Queen. With any luck, I will make some decent progress on Shifty while I'm away and I won't feel quite so ridiculous about having two sweaters in tiny yarn going at once.

The "fun" in this post is all about how working with hand-dyed yarn can require some extra steps and awareness. When I finished winding my yarn for my next sweater -- Fibernymph Dye Works Bounce in a variegated and speckled colorway -- I noticed this:

Notice how two of the four skeins are a little lighter than the other two? Lisa doesn't really do dyelots, but she generally dyes multiple skeins of the same colorway at the same time. I don't know if all four of these skeins were dyed at the same time, but I did purchase them together. I was going to alternate skeins anyway because the yarn is hand dyed (that's always a good idea with hand-dyed yarn), but now that I've seen the difference in the skeins, I will be sure to pay attention to make sure that I'm alternating a lighter skein with a darker one. The variation doesn't bother me in the least, but it's a good reminder to look at my yarn and be mindful of what I'm doing with it.

I hope that whatever you have in store this weekend, it brings you joy! See you back here next week for a recap.

Friday, January 29, 2021

Friday Fiber Fun (2/2021)

The last time I did a Friday post, I shared how I felt in the dryer. I had such fun sharing that I thought I'd make Friday Fiber Fun an occasional series, and as I've posted every day this week, I figured I might as well make the week complete with a post today!

Today's fiber fun is my latest obsession: the scrappy marled hat. I've now finished four of these hats and don't feel bored of knitting them yet, so I imagine there will be still more to come from me. Knitting one of these hats isn't rocket science, especially if you've knit enough basic hats to be able to wing a beanie on your own, but I know not everyone is comfortable knitting without a pattern, and certainly the scrappy nature of these hats adds a level of complexity. So I'm going to give you my basic recipe below and also give you some tips to make knitting one of these hats easier and faster. These are great for charity knitting or when you're knitting for someone whose measurements you don't know.

The Scrappy Marled Hat: A Basic Recipe
To fit an average child (adult) head, with a bit of vertical slouch

Yarn: two strands of fingering, held together
Needles: US 4 (3.5 mm) and US 6 (4.0 mm), or sizes needed to obtain gauge
Gauge: 20 stitches and 30 rounds = 4 in./10 cm in stockinette stitch in the round
Notions: one stitch marker, yarn needle to weave in ends

With two strands of yarn held together and smaller needles, cast on 96 (104) stitches. Join to work in the round, being careful not to twist, and place marker to indicate beginning of round. Work in 2x2 ribbing (k2, p2) for 1 in./2.5 cm. Change to larger needles and work in stockinette stitch (knit all stitches) until hat measures 5.5 (6) in./14 (15) cm or desired length to start of crown. 

Work crown decreases as follows:
Round 1: *K10 (11), k2tog; repeat from * to end -- 88 (96) sts.
Round 2 (and all even rounds): K.
Round 3: *K9 (10), k2tog; repeat from * to end -- 80 (88) sts.
Round 5: *K8 (9), k2tog; repeat from * to end -- 72 (80) sts.
Round 7: *K7 (8), k2tog; repeat from * to end -- 64 (72) sts.
Round 9: *K6 (7), k2tog; repeat from * to end -- 56 (64) sts.
Round 11: *K5 (6), k2tog; repeat from * to end -- 48 (56) sts.
Round 13: *K4 (5), k2tog; repeat from * to end -- 40 (48) sts.
Round 15: *K3 (4), k2tog; repeat from * to end -- 32 (40) sts.
Round 17: *K2 (3), k2tog; repeat from * to end -- 24 (32) sts.
Round 19: *K1 (2), k2tog; repeat from * to end -- 16 (24) sts.
Round 21: *K0 (1), k2tog; repeat from * to end -- 8 (16) sts. Child size ends here.
Round 23: (K2tog) around -- 8 sts.

Break yarn and thread it through 8 remaining stitches. Weave in ends on right side of fabric, then flip the hat inside out to show the reverse stockinette, or weave in ends on inside if you want your stockinette side to show. Block as desired.

Now, the tips!

First of all, if you're planning to flip the hat inside out and you want your cast-on edge to look the same, cast on using an alternating long-tail cast on. This video shows how to do it with a 1x1 rib. I do the same thing, but I cast on two stitches knitwise, then two stitches purlwise.

Next, an easy way to join your scraps: If you're using up lots of little bits of leftovers, you're going to end up with a lot of ends to deal with, and not many of us really likes weaving in ends. So when I knit these hats, I join in new scraps using the clasped weft join. This is actually a technique used in weaving, but it comes in handy in knitting as well and it's a way to avoid having any extra ends to weave in. If you've ever done a Russian join, then this will seem similar to you, but it's much faster and easier. First, when you get to about the last foot of one of your strands, fold it back on itself and place the end between your needles and poking out at you:


You'll now continue to knit a few more stitches, but now you'll be holding three strands together rather than two (don't worry, the extra bulk is totally not noticeable in the knit fabric). When you have just a small loop of the double yarn left, thread the new yarn through it and double it back on itself in the opposite direction:


Continue to knit, holding all the strands together. When the tail of the new strand pokes out, you can just trim it off (I recommend trimming off all the ends after blocking). If you'd like to see a video of this join, here is one showing it in the context of a sock using a single strand of yarn, but the method is exactly the same here. Using this join as you add in new scraps means that when you finish, the only ends you actually have to weave in are from the cast on and bind off.

Finally, the same methods used here can be used for an easy cowl! Do the ribbing, work in stockinette until it's about an inch shorter than the total desired length, do another inch of ribbing, and bind off -- easy peasy!

I hope these basic instructions and tips will help you look at your scraps in a new way!

Friday, January 08, 2021

Friday Fiber Fun

At the beginning of this week, I intended to post something every day. It's something I do occasionally, and I thought it would be fun for the first full week of the new year. Yesterday, though, I just couldn't. While I was not completely surprised by what I saw happening at the Capitol on Wednesday, I was still completely disturbed by it, and I hope it truly shocked some Americans who didn't see it coming.

After taking a day to reflect on it, I have decided that a little thing I can do in the face of such outrage is just continue to live my life, fully and unapologetically, and to find joy and pleasure where I can. Obviously, if you're reading this blog, then you know that my fiber pursuits bring me a lot of joy. So I thought I'd do a special Friday post about some fiber fun, something I may do from time to time in the future.

 
Today I want to share how I felt in the dryer -- well, technically, I'm fulling in the dryer (felting is done with fibers, fulling with fabric), but most people don't know the difference. This is the final step in finishing the two pairs of Snow Day Mittens I've knit in the past month or so. Many people do this process in the washing machine, but there are a number of reasons why you might want to do it in a dryer:

  • You have a front-loading washing machine. Felting/fulling isn't an exact science, so often you have to stop the cycle and check your item's progress. That's something easily done with a top-loading machine, but most front loaders have a lock to prevent you from opening the door mid-cycle, and even if you can pause the cycle, that usually means draining the water and then restarting, which totally defeats the purpose of using less water with a front loader. By doing it in the dryer, you can stop the machine as often as you like without a risk of flooding and without having to wait for a cycle to finish.
  • You don't want to clog up your pipes. One bit of advice that's often given about fulling or felting in the washer is to put your item into a pillowcase or other bag to catch all the fuzz that comes off of it as it's being washed. That fuzz can easily clog your pipes. But when you felt/full in the dryer, it all goes into your lint trap and can easily be removed -- and the whole project is much less messy as a result.
  • You want to save water. While some never washing machines do have settings for small loads, many use the same amount of water no matter how much or how little is being washed. If you're washing in hot water, you typically don't want much else in the washer just in case you have issues with dye bleeding. To full an item in the dryer, you just need to make sure that the item itself is good and wet, which you can do in a small dishpan or the sink with a small amount of water. And if one cycle isn't enough, you can just get the item wet again and put it in for another cycle.
  • You don't want your item to get permanently creased. Many washing machines rely on a strong spin cycle to get water out of the items being washed. That's great on the one hand because it means a shorter drying time, but if you're fulling something, that force can also sometimes cause the item to get a crease in them that can be difficult to get rid of. In contrast, the spin of the dryer is much gentler.

So, assuming you're going to try it, how do you do it? The good news is that it's simple enough that a child can do it (and you might want your kid to help you because it'll be an interesting and educational experience about why you should never put handknits in the dryer unless you're absolutely certain they're superwash!). First, get your item or items good and wet. I use a small dishpan that's kept on one side of our utility sink and is usually used for washing fleece.


You don't have to let the items soak for too long -- just squish them in the water until you can see that the fabric is soaked through. Next, squeeze out the excess (they should be wet, but they don't need to be dripping) and toss them in the dryer along with something for agitation. If you're worried about dye bleeding at all, make sure you're not putting in anything that could get stained or ruined. I tossed my mittens in with some old towels I use for blocking that are already stained and that I'd just washed so that I was doing double duty with my dryer cycle. I also added some dryer balls for additional agitation.


I ended up having to run my dryer through two cycles to get the level of fulling I wanted in my mittens. If you have to do this, I recommend that when you wet your knit items again, you also empty your lint trap, particularly if you have other items in the load -- you'll be surprised by just how much fuzz is in there! When you knit items are fulled to your satisfaction, take them out and lay them out to dry, taking a moment to shape them or stretch them if you need to. It's okay if they're still quite wet at this point. I like to set mine on the top of the radiator to dry in the winter.


All knit items have a point at which they will not full anymore, and sometimes you'll never get to the point where all stitch definition is lost. And while fulling is a one-way street, if at a later point you decide that you'd like to full your item some more, you can repeat the process (though be aware that it might not make much of a difference). Once you've reached that end point, you can safely toss your item in with your laundry and wash and dry as usual, if you like, and just like any knit item, if it fuzzes up, you can use a shaver or Gleener to tidy it up.

So that's it! This process takes some time, but it's largely hands off. I'll also note that while this process is usually done with items that are knit with the intention to be fulled/felted, it can be done just as easily with, say, a thrift-store sweater you want to cut up and sew with or some other knit item that has outlived its first use and is now being repurposed as a hot pad or dusting rag.